Recipes


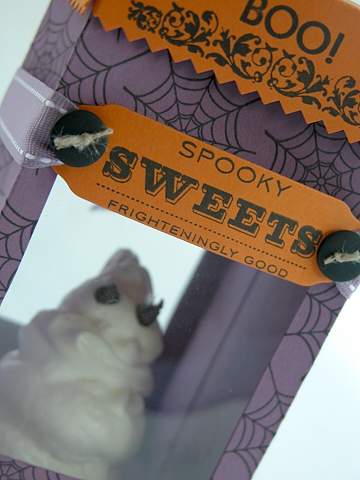
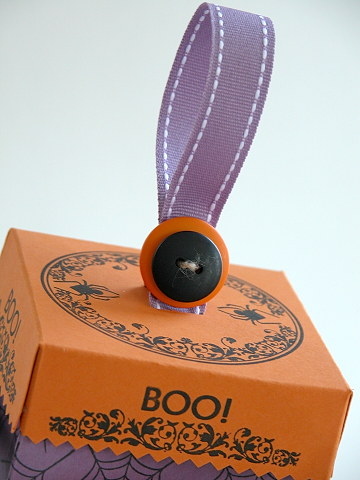
Sophie and I had a blast yesterday making our merengue ghosts!  They turned out so sweetly, I decided to showcase one in one of Lauren’s new Timeless Templates!  Lauren has done such an incredible job with these templates and they can be yours for such an incredibly cheap price…printable and SO fast (plus you get never-before-seen projects from the girls on the PTI team with full color pics and supplies!  Gotta love that!  Well…here is ANOTHER idea!  I just love everything about this!  John said it was his favorite project from me so far!  I think he was almost in tears!  (Just kidding…but maybe he should have been;) )  I mean how perfect would this be for teachers this week on Friday!  How fun!  I am going to leave you with my merengue recipe so you can do this as well!  Go make them…you already have all of the ingredients!  Your kids will be thrilled!

Merengue Recipe:

4 egg whites in mixing bowl add 1tsp. Cream of Tartar

Beat until stiff peaks form

While beating, slowly add between 3/4 cups and 1 cup of sugar (depending on how sweet you like it)

Fill piping bag with merengue (or ziplock bag with bottom corner snipped off) pick favorite piping bag tip.

Pipe on brown paper grocery bag or parchment paper in concentric circles making sure when you get to the top to add a little ghost flip for the top!

Add mini chocolate chips for the eyes

put paper in the oven and bake at 250 degrees for two hours at least.  You are essentially just “drying out” the meregue, not baking it per se.


SUPPLIES:

Template: My Timeless Templates “For Keep{sake}”

Stamps: Spooky Sweets, Spooky Sweets II

Paper: Plum Pudding, Pumpkin SU!, Transparency

Ink: Noir Palette

Ribbon: Plum Pudding Stitched Grosgrain

Other: Buttons, Linen Thread SU!

EDITED TO ADD:

After viewing my blog on my work computer and my laptop, I have noticed that some things or all things in my sidebar have disappeared.  Don’t panic!  I am having some work done on my blog that is very exciting and will be revealed soon!  Thanks for your patience if some thing are not showing up or have gotten a little shuffled!

Yeah I know, right??  Too stinkin’ cute.  Well…maybe not to Pine (’cause owls freak her out), but this is my take on the coolest kid Halloween/autumn cupcakes evah!!!  Isn’t it too funny…like the big owl is thinking “Will you get the heck off of my face!?”  I was going to put the stamped owl on the band going around the bottom (the complete NORMAL thing to do), but I decided it was just plain funny over his eyes, so I went for it!!  This way you can really see the sentiment well.  Just a whimsical idea for your autumn fest or Halloween party.  The girls actually made the rest of the owls after I took this picture and did a great job, so it is a suitable thing for kids (8 and up)  to take on as a project as well, just fill the piping bag for them!!

Supplies:

Stamps: Wise Owl, Spooky Sweets II {Papertrey Ink}

Paper: Vintage Cream

Ink: Dark Chocolate

Ribbon: Dark Chocolate Twill

CUPCAKE:  Ice cupcake.  To make eyebrows and ears put your chocolate icing in a piping bag (if you don’t have a piping bag, just put your canned icing in a ziploc bag and cut a small part of the corner of the bag off. 

Eyes: Mini oreos, a little bit of icing for glue and an M&M. 

Nose: A yellow M&M on its side

For the Band: I just cut a strip of vintage cream CS, then used a glue dot to close it in the back.  The glue dot is nice, because it can be repositional if you need to adjust it.

ptiteasugar1.jpg  Do you know what this is?  Just sugar!  I molded the sugar in some chocolate lollypop molds from the craft store in acorns and leaves.  This is a very simple yet beautiful project!  Just take one beaten egg white and add it a little bit at a time to about 3 or four cups of white sugar (splenda may work too) and add food coloring.  Mix it up until it is a sandy consistancy and put in molds immediately.  You can also try miniature ice cube trays…anything that is a flexible mold should work.  Pack the sugar in well, then unmold immediately onto a cookie sheet.  Place all of the unmolded sugar in a 200 degree oven for ten minutes, and you will have beautifully molded sugar for your tea or coffee!! 

ptiteasugar2.jpg

ptitea1.jpg  I decorated the tin of the sugar by using a big chipboard “E” and covering it with chocolate chip ink.  I then placed it where the “E” should go for the word “enjoy”.  This stamp is from Papertrey Ink’s Holiday Treats set.

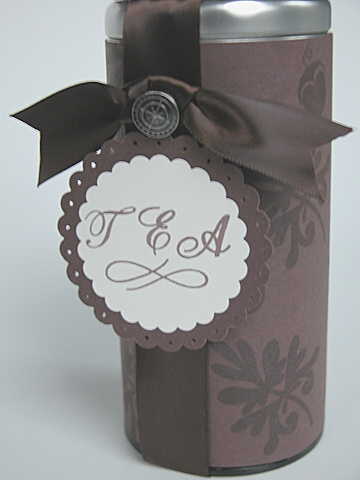
ptitearedo1.jpg Of course you need some tea with your sugar!  Here I decorated a tea tin using chocoalte chip CS and ink and Papertrey Ink’s Ambassador monogram, Spiral Bouquet (leaf) and My Punny Valentine (acorn)

ptitea2.jpg  The top of the tin was done by using the Holiday Treats set again, with the tea cup for the center of the circle.

ptitea4.jpg  The card was made by using the borders and corners monogram edition as well as the “For You” sentiment from Papertrey’s Limitless Labels set.

ptitearedo2.jpg Hope you enjoyed our tea together!

Here is a recipe that will please everyone because of how well it can be modified, even for the same meal.  If you have kids you probably have ham and cheese in the house.  The only things you will have to get for this meal may be the spinach, feta cheese and the marinade packet.  This is not a difficult recipe and it cooks quickly.  Believe me, I like things fast and simple but that taste amazing.  Here you go.

Here is your product list:

  1. Pack of Chicken Breasts
  2. 10 oz pack of frozen chopped spinach
  3. Tub of Crumbled Feta Cheese (get flavored if you want!  You will have extra yummy garlic etc. in your food without the hassle of adding it yourself)optional: deli ham and swiss or american cheese slices
  4. McCormick Grill Mates Zesty Herb Marinade Packet (If you are not familiar with this product, it is AMAZING.  The “Grill Mates” are my favorite line of seasonings.  Restaurants use these and the quality is the best on the grocery store shelf.  They also come in shaker form, but the marinade is better for this recipe.  You can shake on seasoning in a pinch though.   (You will need white vinegar and oil for the marinade)

Stuffed Chicken Breasts: 

  1. Make marinade in pyrex or stoneware baking dish.  Put aside.
  2. butterfly each breast cutting them through the side, but not all the way through.  Pound as thin as possible on the cutting board between two sheets of plastic wrap.  This allows for easier cleanup and avoids cross contamination.
  3. put frozen spinach in a strainer and run it under hot water until it defrosts all the way.  Then sqeeze and paper towel dry the spinach so it has little to no water in it whatsoever.  Put the spinach in a bowl and add salt, garlic powder or garlic.  You may be generous with your amount of salt unless you have dietary concerns. 
  4. Add the Feta cheese to the spinch and mix it around.
  5. Put some of the mixture on to the chicken breasts and roll up.  OPTIONAL: at this point, you can add some ham and cheese to some of the chicken breasts to make cordon bleu wrapped chicken.  Or just leave the chicken plain in the marinade.  All in the same dish!
  6. Roll the chicken roll in the marinade to get it covered, but then place the rolled up chicken seam side down as to not have spillage in the oven.

Bake at 350 degrees for 35-40 min. 

I had pictures of this dish, but my dear husband erased them by accident.

Since I have no card today, I will leave you with a picture of my girls on a really cool ride in Germany.  They had bungee cords attched to themselves and could jump on tramoplines.  It was really fun and the girls loved it!

dscn5918.JPG


  A great gift AND recipe!

Isn’t this little Santa rockin’ with his cup o’ Joe?  I am in love with these 2, 5, 7, 10 boxes.  Now you just need to fill this box with a bag of coffee or those little ones from Wawa or your convenient store, and a couple of tablespoons of chocolate chips (in a seperate little  bag of course) and throw this recipe in with it.  You’ll have a friend for life!!  I think I may do something like this for my girls Sunday School teachers this year if I can find out if they like coffee.  Here is the link for the boxes in case you missed it in an earlier post: http://www.splitcoaststampers.com/resources/25710box.php


  santajava.jpg

 Java Chip Frappuccino

I N G R E D I E N T S
4 tablespoon chocolate syrup
4 tablespoon chocolate chips
4 cups double-strength freshly brewed dark roast coffee
Chopped or crushed ice and (sugar to taste)
Whipped cream (optional)
Chocolate syrup (for drizzle, optional)

I N S T R U C T I O N S
Fill blender half full with chopped or crushed ice. Add all ingredients (except whipped cream) and blend until thick and still icy. Pour into 4 tall glasses, top with whipping cream and drizzle chocolate over the whipped cream. Serves: 4

Our first recipe is my mom’s and comes from a cookbook she helped to develop when she was an inkeeper in Charleston, SC at the Ashley Inn.  You can cook it tonight because I bet you have all of these ingredients in your cupboards right now!  This is a great side dish to any meat dish or a complimentary vegetarian dish!

Southern Corn Pudding

3 cups corn (I use canned)

3 eggs slightly beaten

1tsp. salt

1/8tsp pepper (I just throw these in til it looks good 🙂 )

3 Tbsp. melted butter

3 Tbsp. Sugar

1  1/8th cups scalded milk (I just throw my pyrex measuring cup with the milk into the microwave for 2 minutes)

Combine ingredients and pour into a buttered casserole.  Bake for 30-40 minutes at 350 degrees or until set. 

THIS IS YUMMY AND EASY!!!!  TRY IT!!!  I have it for Thanksgiving every year!  Reheats well in microwave too!