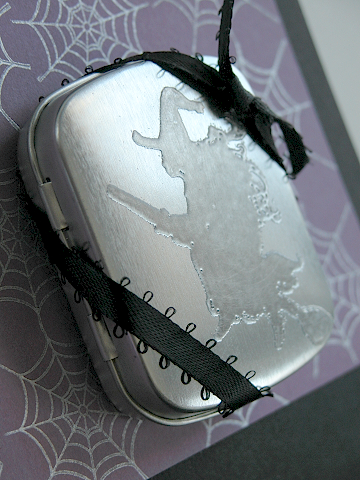
Well, this is just too fun! Remember I told you I was going to give you lots of gift ideas coming up in the future! Well…here is my first one! You know, I have been staring at these small hinged tins thinking…what the heck can I use these for other than mints? Well…DUH! It hit me like a witch’s broom! (OK…that was really bad, but at least it wasn’t a cliche). So first of all I got out my clear embossing powder…OK…yeah…it sort of has become my favorite technique, but we all go through phases…don’t judge. 😉 I prepared the tin…with my embossing buddy…LOVE those things and SO important when using embossing powder on tins. WHY? Well…if you have tried this before, you know that the tins are SUPER STACKED with static electricity. Meaning…even after you have nicely inked up your image, you are still left with embossing powder specs all over the tin. Not good. So…make sure you prepare your WHOLE tin with the embossing buddy (mine is from Stampin Up!). If you do not have an embossing buddy, I have used a USED dryer sheet before. It doesn’t work AS well, but it helps a LOT.
So…prepare the tin, ink up your image with versa mark ink, or any embossing ink you use. Put the clear embossing powder on it. Then heat until it all dissolves. Let it cool. your tin will be HOT people! CAREFUL! Don’t touch it for a good minute. after it is done cooling, I pulled out my black chalk ink for the witch. I put it all over the embossed image and let it sit for a second. Then I wiped it off (no…it doesn’t matter if it gets onto your tin while working, it slides right off), then I repeated it until it got the desired effect I was after. I like the fact that it looks like pewter. It is VERY cool. I did the same thing with the cat, but then used a midight blue ink as well as a purple shimmer ink (all versa mark chalk inks). Do you see how it has a purple hue around him! Perfect to go with the ribbon and card stock I chose for the inside! The best part about using these stamps were the fact that they were silhouette images, which gives you a nice body of embossing and made the image really memorable. SO…what did I make? An earring tin to hold some really cute halloween earrings I found in Kohls! I know the girls will love these and I plan to give them to them today after I post this, so they can get the most wear out of them! They will have a nice place to store them for next year!
Stamps: Spooky Sweets II {Papertrey Ink}
Paper: Plum Pudding (I used my paper piercer to make the earring holes in the paper)
Ink: Versa Mark, Midnight Black Chalk Ink, Night Sky and pearlescent purple chalk inks {Kitchen Sink Stamps}
Other: Small Hinged Tin, Clear Embossing Powder, heat gun, dimensionals (for behind the paper inside the tin)
Ribbon: Plum Pudding Luxe Satin, Black eyelet ribbon (Michaels)


September 23, 2008 at 12:47 pm
Are you kidding me! What a terrific project. I don’t really understand how you got it to look like that, but it is sooooo cooool. I’m so glad you have a use for all those nifty tins; they’re like a free craft supply.
September 23, 2008 at 5:15 pm
What a great idea. I must start using my embossing things more. I love your gift ideas!
Joan
September 23, 2008 at 9:14 pm
The embossing looks SO cool!!! What a fabulous idea!!!!!!
September 24, 2008 at 2:21 am
Very cool Becky!! I never would have tried embossing on tin – cool idea! 🙂
September 24, 2008 at 3:05 am
So creative! These are adorable. Such cutie patootie earrings. I hope you got yourself a pair!!
September 24, 2008 at 9:50 am
These are AWESOME. What a great idea. Thanks so much for always being such an inspiration 🙂
Teresa
September 24, 2008 at 2:14 pm
The cupcakes are adorable. How very clever you are. Thanks so much for sharing.
September 24, 2008 at 7:00 pm
those earring holders are adorable!
September 25, 2008 at 3:41 am
Thanks for the wonderful idea with the embossing powder! I would never have thought of it. Love the luster that the chalk inks adds. It really looks like pewter! Terrific idea to tuck away any small surprise!
September 26, 2008 at 6:30 am
This is a fabulous idea Becky! Too cool! 😀